Monday, June 24, 2019

Strawberry Crepe Cake


This cake has been a joy to make. Not just make, but bring to the table, as we welcome Tammie into our family. She is my son's fiancee and a fan of good food. So this dessert is a fitting end to a lovely meal. She recognizes the crepe cake for what it is! I'm impressed!


I see a similar cake in a food magazine. It involves an obscene amount of cream and blackberries. I replace the blackberries with strawberries, and cut the cream portion significantly. Once made, the crepe batter needs to sit for a few hours.That allows the crepes to develop that lacy texture. Use melted butter to brush the crepe pan with every crepe you swirl. It will make a softer, more flavorful crepe. The batter makes a lot of crepes. Do not despair. You will need at least twenty or twenty two crepes to build the cake. The filling is made with fresh strawberries, processed till pulpy. Mascarpone, cream and sugar are blended with the strawberries to make a slightly chunky filling. Before you know it, the stack rises. Refrigerate till ready. Decorate with additional whipped cream and strawberries. Cut cake into wedges. Its a wow thing!


STRAWBERRY CREPE CAKE
Adapted from  Food and Wine magazine
Serves 6-8

Crepe Batter
Makes about 30 6 inch crepes
1 1/2 cups all purpose Flour
2 tablespoons Sugar
1 tablespoon Lemon zest
1/2 teaspoon Kosher Salt
6 Eggs
2 cups Milk ( Whole or 2%)
1/2 cup heavy Cream
5 tablespoons melted Butter

Strawberry Filling
2 cups diced Strawberries
1 8oz tub Mascarpone, at room temperature
A pinch of Kosher salt
3 tablespoons Icing Sugar
1/4 cup heavy Cream or more if needed

Topping
1/3 cup heavy Cream
1 teaspoon Sugar
5-6 Strawberries

Whisk flour, salt and sugar in a bowl.

Break eggs into the blender container.

Add milk and cream to eggs. Blend for 30-40 seconds.


Add flour mix and lemon zest to eggs. Blend again till flour is incorporated. Scrape any flour on the sides of the blender into the batter.

Pour batter into a bowl. Cover and refrigerate for 4-5 hours.


Allow the batter to sit at room temperature for 15 minutes before making the crepes.

Place a 6 or 7 inch nonstick crepe pan over medium high heat.

Brush pan with melted butter.

Ladle about 1/4 cup of batter onto the hot pan and swirl pan to spread batter.  Adjust the batter amount depending on the size of your pan. 

Brush the pan with butter before ladling the batter. Brushing with melted butter allows the batter to swirl and spread effortlessly.  Let the edges turn golden, about 30 seconds to a minute, then flip the crepe on the other side and allow it to cook for another 10-15 seconds. Remove from pan onto a plate. Repeat with remaining batter.

Stack crepes on top of one another. You can make the crepes a day earlier and keep them in the fridge covered in plastic wrap.

The trick to making thin crepes is all in the wrist. It might take a few attempts to get 
the thinness you want. 

Cool crepes before layering.

Make the filling the day you assemble the cake.

Pulse strawberries in a food processor till coarsely pulped. ( See Notes if you do not have a food processor)


Add mascarpone, sugar, salt and cream. Pulse till filling looks smooth about 8-10 times.  Scrape filling into a bowl. 


Assemble cake by laying one crepe on a plate. 

Spread 2 tablespoons of filling over the crepe with on offset spatula.


Top with another crepe and repeat this process till you run out of filling. 

Use as many crepes as you like. I used 22.

The top layer should be a plain crepe.


Cover cake with plastic wrap and refrigerate for 1/2 hour. 


Make the topping by whipping cream till stiff.  

Add sugar and mix.

Spread cream over the top layer.

Slice strawberries and arrange in a rosette in the center. 


Refrigerate till ready to serve. Cut into wedges and enjoy!


NOTES

If you do not have a food processor, mash the strawberries with a potato masher till pulpy. You could use a hand mixer to whip the rest of the ingredients together or do it vigorously by hand. Aim at getting a smooth filling. If you have big chunks of berries the filling will be lumpy, resulting in uneven layers as you build the cake.


We love love love the cake. Strawberry comes through strongly, with a hint of lemon. It isn't too sweet which is always a good thing. And then there's all that cream. This is a special dessert, made for a special occasion. Rehan and Tammie are the cream of the crop!


Friday, June 21, 2019

Jackfruit Biriyani


A vegetarian biryani is a novelty in itself. Making it with jackfruit or kathal as they call it in India, lets the flavors soar. I came across this concoction at the now defunct Devi restaurant in New York. Geets and I wanted to savor Suvir Saran's solo venture. Gobi manchurian arrived with a flourish. Kababs melted in your mouth. A triangular molded mound of reddish brown rice arrived on a pristine white plate. Crisp fried okra garnished the rice. Breaking into the mound, revealed a meaty interior, small jackfruit triangles nestled in the rice. The taste was divine. We oohed and aahed. It was love at first bite.  

Geets knew how enamored I was. For my fiftieth birthday she experimented with a similar version. The recipe called for fresh jackfruit. Living in a remote Kentucky town, I'm not sure how she sourced this exotic vegetable! It isn't easy to work with. It has a hard pokey exterior. When cut, it oozes a sticky sap, which irritates the skin. The flesh is fibrous with large seeds. How do I know this? I have seen it in my childhood. And I knew Geets would have struggled with these issues! She did! The veggie was discarded due to incorrect handling! With her fingers and palms in bad shape, she expectantly moved to the canned variety. With success! The biryani was waiting for me. We spooned some on to plates. My son dug into his with gusto, relishing every bite. And then told Geets the pork tasted delicious!

I too use canned jackfruit. It is easy to work with, always within arms reach. Rinse it well and add it to the Indian quartet of onions, ginger, garlic and tomatoes. Spice powders add necessary flavor. Basmati rice is the base layer. Jackfruit masala lays over the rice. Two more layers of rice and masala and a sprinkle of fried onions. The biryani bakes. We salivate.


JACKFRUIT BIRYANI
Adapted from Suvir Saran
Serves 4


1 can green Jackfruit
2 cups Basmati Rice
1/2 teaspoon Kosher Salt
2 tablespoons Canola Oil
2 large Onions
3 Ginger slices
4 Garlic cloves, minced
5-6 Plum Tomatoes
1 tablespoon Tomato paste
1/2 teaspoon Turmeric
1/2 teaspoon Chile powder
1 tablespoon Coriander powder
1/2 teaspoon Cumin powder
1/2 teaspoon Garam masala
1/2 teaspoon Kosher Salt
# tablespoons Lime Juice
3 tablespoons Cilantro leaves
1/2 cup Fried Onions


Rinse jackfruit in cold water and keep aside.


Wash rice well till water is clear. 

Add 4 cups water to rice. Bring to a boil. Cover with a lid. Turn the flame to very low and cook for 14 minutes. Open lid and fluff rice with a fork.


Slice onions thinly.

Puree fresh tomatoes.

Heat canola oil in a deep saucepan.

Add onions to hot oil and saute till light brown.


Add ginger slices and minced garlic to onions and saute for a minute.

Add tomato puree and paste to onions and saute well. Allow tomato to simmer for 5 minutes. ( I had frozen plum tomatoes. I peeled the skin off and added them to the onions. They turn into a puree like consistency in a few minutes.)


Add jackfruit pieces to onions.


Sprinkle turmeric, chile powder, coriander, cumin and garam masala over jackfruit. 

Season with salt. 


Bring the masala to a simmer and cook for 10 minutes.

Stir in lime juice and fresh cilantro. 


Light oven to 350F or 180C.

Spoon half the rice into an ovenproof dish.

Ladle half the jackfruit masala over rice.


Continue with remaining rice, followed by the rest of the masala.


Scatter fried onions over the top.

Cover dish with aluminium foil and bake for 30 minutes.


Uncover and enjoy!


This is a one dish meal that satisfies all your biryani cravings. We enjoy it with relish and remembrance. 


Tuesday, June 18, 2019

Chocolate Cherry Tartlets


In our house chocolate is synonymous with father. Our main man loves everything chocolate. Preferably in the original unadulterated bar form, but relishes other delicacies as  well. So on Father's Day, I oblige him with these tartlets.

I discover a tart recipe that does not include blind baking. Hurrah! Flo Braker, in my opinion, is a genius baker. I adapt her tart recipe. Much as I love making tarts, the process of lining small tart pans with foil and baking beans is laborious. So this recipe frees me from tart crust bondage! 

The dough comes together easily in a food processor. Small balls of dough are pressed into tart pans. They bake while I make the chocolate ganache. Once the tarts have cooled, they filled with a few cherries. I use frozen cherries, defrosted and patted dry. Jarred ones would work as well. I haven't given fresh cherries a thought as it would mean a different taste quotient,  as well the dreaded task of pitting them. Chocolate ganache is then spooned over the cherries. Tarts set in the fridge.. If it is a warm day, keep them in the fridge till you serve. You don't want the ganache to become soft and runny. I take them out of the fridge just before serving. They glisten with temptation!


CHOCOLATE CHERRY TARTS
Makes 15 tartlets


Dough
1 1/4 cup all purpose Flour
Pinch of Kosher Salt
2 heaped tablespoons Sugar
8 tablespoons cold Butter
1 Egg
1/2 teaspoon Vanilla

Chocolate Ganache
3 oz semisweet Chocolate chunks
1/4 cup heavy Cream

15-20 pitted Cherries 
Icing Sugar


Place the flour, salt and sugar in the bowl of a food processor.

Whisk egg and vanilla in a bowl.

Cut the butter into thin slices.

Pulse flour a few times to mix.

Scatter butter over flour. Pulse mix till the flour resembles coarse panko breadcrumbs, between 10-15 pulses.


Add egg to flour with the processor running. Pulse till the dough comes together in a ball.


If you are making this by hand, use your fingertips to rub the butter into the flour till the mix resembles coarse panko breadcrumbs. Add egg to flour and pull dough together till you have a smooth ball.

Heat oven to 350F or 180C.

Break off a heaped teaspoon of dough and roll it into a ball. Place ball in a mini tart pan. Use your thumb to spread the dough all the way to the edge of the tart pan. You should have a thin shell. You might have to add or subtract dough as you work the tarts. 


Place tart shells on a baking sheet and bake for 15-20 minutes. The tarts should be light golden.


Cool shells. Gently pop them out of the tart pans. 


Make the chocolate ganache by placing chocolate chunks in a bowl.

Heat the cream till gently bubbling.

Pour cream over chocolate. Wait 10 seconds before whisking. Whisk till smooth and shiny.


Pat cherries dry to avoid any liquid at the bottom of the shells. 


Place 2 cherries in each tart shell.


Spoon ganache over cherries, covering them.


Allow the tarts to set in the fridge. 


Take them out just before serving.

Dust with icing sugar and enjoy!


The tarts look lumpy and rustic. They are delicious. They vanish into the chocolate lover's maw very fast!


Saturday, June 15, 2019

Burrata Watermelon Salad with Thai Basil


Make this when you have little time to make a salad. Make it when you want a simple but delicious side. Make it because it tastes so damn good. Believe my words and just make it. 

This barebones salad needs the sweetest watermelon, room temperature burrata, thai basil, extra virgin olive oil, slat and pepper. Use the best sea salt you have. Grind your pepper fresh. Flavor rests in the freshness of product. Chinks of watermelon surround a mound of burrata. Slivers of basil fleck the salad. Olive oil ribbons coat the salad. Season well. Reap the rewards!


BURRATA WATERMELON SALAD WITH THAI BASIL
Serves 2 as a salad course


2 cups cubed Watermelon
1 ball of Burrata, at room temperature
2 tablespoons Thai Basil 
Extra Virgin Olive Oil
Sea Salt
Freshly ground Black pepper


Place burrata in the center of a serving dish.

Surround burrata with watermelon cubes.

Cut basil into thin slivers. Scatter over watermelon.

Drizzle olive oil generously over salad.

Season with salt and pepper.

Enjoy the salad!


The crunch of watermelon, The softness of cheese. The spicy pop of basil. The unctuousness of olive oil. Heaven on a plate!

Tuesday, June 11, 2019

Sriracha Shrimp


What is easy and fast to cook and tastes delicious? Something small? Shrimp! Though mine is rather large...more jumbo sized. Yet they will cook quickly. It's what's on my plate tonight. 

These large shrimp are cleaned, butterflied and marinated for a short while in a spicy Sriracha and oil marinade. The grill pan helps them caramelize. It is the quick twist of the wrist, the fast flick of a knife and a ready fork to enjoy this meal.


SRIRACHA SHRIMP
Serves 2

4 jumbo Shrimp
2 tablespoons Sriracha sauce
1 tablespoon Olive Oil
1/2 teaspoon Garlic paste
2 teaspoons Lime Juice
1 teaspoon Sugar
1/2 teaspoon Kosher Salt
1/2 teaspoon ground Black Pepper
Canola Oil Spray


Peel shrimp, leaving the tail on.  Devein and wash well. Pat dry.

Butterfly shrimp., leaving the tails on. 

Make a marinade by whisking Sriracha, olive oil, garlic paste, lime juice, sugar, salt and pepper together in a bowl.


Add shrimp to marinade and keep aside for 20 minutes.


Heat a stovetop grill pan over a high flame.

Coat the pan with canola spray and add shrimp to pan. Cook on all sides for a total of 3-5 minutes till golden and the edges have caramelized.


Enjoy them plain or with greens and a salad.


The shrimp have a simple clean taste, with faint chile undertones. Enough to let the star shine...full of jumbo flavor!

Wednesday, June 5, 2019

Roasted Eggplant and Harissa Mashup


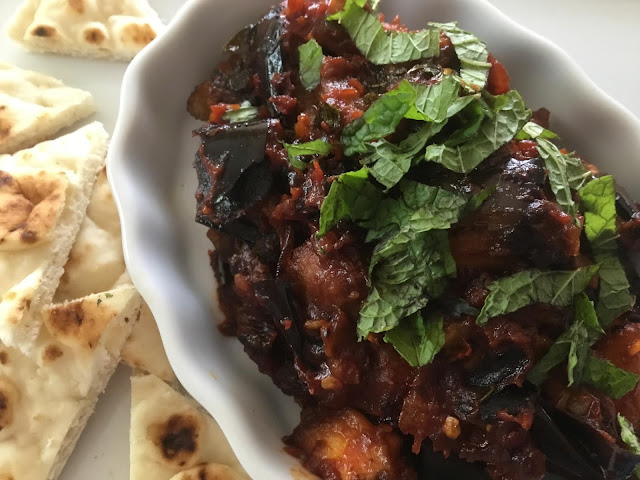
Nosh food is a genre close to my heart. Small plates to be sampled with wine or cocktails is trendy. You could carry the concept over to lunch. A soup or salad and a plate of roasted eggplant, cooked slowly with spices and harissa? Sounds and tastes delicious. 

I grill thick slices of eggplant. The base starts with pale brown onion, garlic and tomato paste. Add some chopped prunes. Allow the base to saute low and slow. Add the roasted eggplant, harissa paste, a splash of champagne vinegar and some mint. Do as the title suggests...mash it well. Let the flavors develop as they cook. 

Heat triangles of garlic naan or pita. Scoop the mash up.


ROASTED EGGPLANT AND HARISSA MASHUP
Makes 2 scant cups
DF, GF, VN, WF, VG, EF


1 medium Eggplant
Olive Oil
1 large Onion 
4 Garlic cloves
2 heaped tablespoons Tomato paste
1/2 cup pitted Prunes
2 tablespoons Harissa paste
1/2 teaspoon Champagne Vinegar
1/2 teaspoon Kosher salt
Several grinds of Black Pepper
15 Mint leaves, slivered
Garlic Naan, Pita bread or Crackers


Cut eggplant into 1 inch thick slices.

Preheat an outdoor or indoor grill.

Brush eggplant slices with olive oil on both sides.

Grill slices till soft and charred, flipping occasionally. 


Take them off the grill. Cool and chop into small dice.


Heat 2 tablespoon olive oil in a nonstick skillet.

Chop onion into small dice and add to hot oil. Saute till pale brown. 

Peel and slice garlic and add to onions. Let garlic bloom for 30 seconds.

Add tomato paste to onion and stir well. Let the tomato paste saute for a few minutes.


Add prune to onions. 


Saute onion and tomatoes on a low flame for 30 minutes, scraping the pan often.

The tomato paste will thicken and change color to a deep maroon color as you saute. 


Add chopped eggplant, harissa paste, champagne vinegar, salt, pepper and mint leaves. 


Allow the eggplant to cook slowly on a low flame for 15 minutes.


Scrape into a bowl.

Garnish with mint leaves, along with warm naan or pita triangles.


My soup and eggplant lunch satisfies in umpteen ways. A fun mash that's uplifting!