Sunday, July 28, 2013

Family Favorite--Potato Coated Lamb Chops


Culinary requests continue to pour in. And I continue to oblige.  I want to please. To satisfy. This time it's lamb chops coated with potatoes. Meat and potatoes, Shauna's favorite food groups. My mind is an eddy of emotion, sad and glad. My daughter leaves to start afresh in another city. She has left for college many times  in the past. I knew in my heart she would be home in a few months. This time it is different. This time she leaves to make her mark on the world. And yet as she sprouts wings, my heart fills with pride. It is a good thing. I put feelings aside and cook furiously. Childhood favorites. Recent delights. A parade of delights emerge from the kitchen.

In the past I would make these lamb chops as an addition to our usual Indian dinner. The family would inevitably make a meal of the chops and forget about the other food! Finally I wise up. So tonight it is to be exclusively chops. A lot of them. 

Potato-covered chops are a bit of chore to make. what I mean is that you have to cook the potatoes and lamb separately, then cool them and later make the mash. You form them next, after which comes the breading and frying. Are you exhausted already?  But they taste so good. A warm bite of potato and masala lamb with a crusty crunch makes your tastebuds sing! Yukon Golds are perfect potato for the coating as their buttery yellow flesh makes for the  perfect consistency. When you are done with the meat and its potato jacket, you get to gnaw on the bone and pick out the morsels you missed! What joy for bone lovers. And such a delight to watch!😏Yeah! I'm yanking your chain. We have but one bone lover. Rest assured....watching him is not that pleasant a sight! What we do for love!

Potato Coated Lamb Chops.
Makes 8 pieces

1 Rack of Lamb
1/2 teaspoon Chile powder
1/2 teaspoon Garam masala
1/2 teaspoon Kosher salt
1/2 teaspoon Garlic paste
3 coins of Ginger
6 medium Yukon Gold Potatoes
1/2 teaspoon Kosher salt
1 Egg
1 cup Breadcrumbs ( more if needed )
Canola oil for frying


Trim the rack of lamb of fat. 

Cut the rack into individual lamb chops. You should get eight chops.  


Put the lamb chops into a saucepan.

Add chile powder, garam masala, salt garlic paste and ginger slices. Stir to mix well.


Add enough water to cover the chops. 

Put the pan on a high flame and let water come to a boil. Cover, lower flame to medium and let chops cook for 25-30 minutes or till they are done. Poke the chops with a knife tip. If the knife slides in easily, they are done. Stir the chops every so often. 

Once the chops are done, turn the flame up high and reduce the gravy. This could take anywhere between 15 and 20 minutes, depending on how much water was left. You should be left with a film of gravy on the bottom of the pan. Try not to let the chops burn. Let the chops cool.

While the chops are cooking, boil the potatoes. 

When the potatoes are done, remove from the water, peel and rice them. Mix to make a smooth mash.

Season with salt and cool.

Divide the mash into 8 orange sized balls. 

Take one ball and flatten it slightly.

Place one chop in the center of the ball and start molding the potato around the chop. The chop should be completely covered with the mash.


Do the same to the other seven chops.

When you are ready to fry, break the egg in a bowl and whisk it lightly with a fork.

Spoon about 2 tablespoon of breadcrumbs onto a wooden board. 

Holding the chop by the bone, dip it gently into the whisked egg.

Then place it on the crumbs. Using your finger, sprinkle crumbs all over the egg- coated part, making sure to cover all the potato.


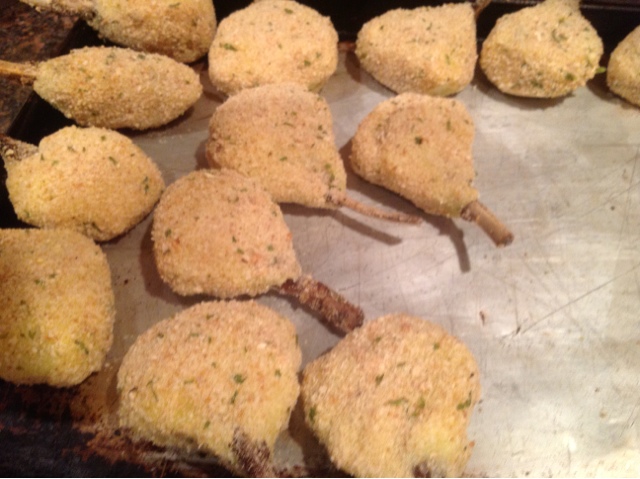
Do the same to the other seven.

Heat canola oil in a deep saucepan or use a deep fat fryer.

Test the oil by dropping in a few crumbs. They should sizzle when they hit the oil.

Add the chops gently to hot oil. Depending on the size of your pan, you could fry two or three chops at a time. Fry them for a few minutes until they turn golden brown.

Serve them warm. Watch them go like hotcakes!


NOTES

I use lamb chops for ease and convenience. Mutton or goat meat chop are traditionally used. Both taste great.

The chops could be cooked in a pressure cooker too. Just bring the water to a boil, cover with the lid and follow the pressure cooker directions. Cook the meat for 15 minutes. Once the pressure has cooled, remove the lid and reduce the gravy as the recipe above states.

Yukon Golds are my personal favorite. Feel free to substitute any potato.


The tray barely reaches the dinner table and fingers reach in laying stake to brown gold. We talk and eat and wipe greasy fingers on pristine napkins. Chops vanish into hungry pits. Bones are picked clean. Crumbs decorate plates. Another request accommodated. And a none too distant repeat performance is requested!!!!


Wednesday, July 24, 2013

Bounty from the Garden-- Zucchini Pancakes


Zucchini is not only a summer delight but also an edible challenge for me. How many ways can I cook them? My triplets spread their huge leaves in lush splendor.  At this point in the season, it is the only vegetable ready to be twisted off. I inspect them in the mornings, pleasantly surprised to see an abundance of flowers and finger-sized squash hidden under leafy canopies. The idea of stooping down to snip squash blossoms is exhilarating. Culinary ideas float through my mind. Finding blossoms with tiny squash attached, is a bonus. Green summer squash fools the eye all the time. And sometimes that results in elephant trunk-like baseball bats instead of the real thing! But the season is young so I have a chance of finding that baseball bat. Not this month though. I reach for small squash peeking under thorny stems. Who would've associate thorns and zucchini? They have nasty prickly stems that will scratch unexpectedly. 


Today I pick flowers and small zucchini. Ideally, mornings are best to pick squash blossoms. By 8 am they have their dentist moment in the sun. I see some from the window, gaping yellows, peeking between shades of green. At noon they clam up, petals closed, protecting their virtue. Basket in hand, I find more than I need. I cut flowers with thin stems, the females. I leave the male flowers which grow into green batons.  I shake the flowers vigorously and see a number of bugs fall out. Ants love to nestle deep inside the petals. I open a blossom and out pops a fly. As I move the sharp leaves and stems I spy small squash well hidden. The camouflage fool's Shauna often. Not me though. I spy with my eagle eye....several tender zucchini!!! My basket is full and and my arms are barely marked.  So it's back to the kitchen.

I think I will make zucchini pancakes. We all love them. And what's not to love. A crispy nugget full of zucchini, goat cheese and an unexpected addition....Fava beans.


Zucchini Pancakes 
Makes 12 small pancakes


2 small Zucchini
1 teaspoon Kosher salt
I Egg
3 tablespoons Flour
1 teaspoon Baking powder
1 teaspoon Lemon zest.
1 large pinch Kosher salt
1/2 teaspoon ground Black Pepper
1/4 cup Goat cheese
1/2 cup cooked Fava beans
3 to 5 tablespoons Canola oil
Sour cream


Grate zucchini on a small holed grater. I find the small holed grater works best for me. The larger holes will work too. It's your choice.

Place zucchini in a colander and salt. Let the zucchini sit in the colander to drain for 2 hours. The salt allows water to leach out of the veggies.


Squeeze handfuls of zucchini to remove as much liquid as you can . Place the squeezed zucchini in a bowl.

Add egg, flour, baking powder, scant salt, lemon zest and black pepper and stir well to mix. 


Roughly chop the fava beans.

Crumble goat cheese and add to zucchini.


Stir in fava beans gently.

Heat 2 tablespoons of canola oil in a large non-stick saucepan on a high flame.

When the oil is hot, a few minutes later, add dollops of zucchini batter and flatten slightly. You should be able to drop in 4 or 5 pancakes at a time. 


Let pancakes turn brown and crusty before you flip them.. This should take 3 to 4  minutes. Once flipped cook them for a minute and remove the pancakes to a paper towel lined sheet pan.


Finish the remaining batter the same way.

Eat the pancakes warm, with sour cream. 


There is something so wholesome about eating the bounty from your garden. You forget the sweaty effort that goes into digging vegetable beds. You watch and wait in eager anticipation for your plants to grow, to flower, to fruit. And the moment comes when you pluck the first zucchini or tomato, as it is in my case. Today we eat pancakes, knowing full well what comes next. Zucchini bread. Squash blossoms stuffed with goat cheese. Grilled zucchini. Zucchini stir fry. Zucchini kofta curry. Squash blossom tempura. Inspiration and perspiration all summer long!


Saturday, July 20, 2013

Sizzlers with Chicken


A request for dinner comes surreptitiously, knowing that heat prevails. The weather really calls for uncooked or raw food, primarily salad or a cold soup or just plain ice cream. But this request is a stand-in-front-of-the-oven dinner!!! I must be a real sucker for punishment because I give in to unholy demands. This request is for my interpretation of the Indian sizzler. The meal, not the weather!

The kids first had sizzlers at Yoko in Bombay several years ago and LOVE them. The idea of watching steaming cast iron plates, piled high with vegetables and a meat, make them salivate in anticipation!! The menu is scattered with names like Lamb Toridango (Mum's favorite), Chicken Shashlik (Dad's favorite), Hamburger with Pepper Sauce (my favorite) and a host of improbable names.  I am thrilled that the kids will eat an ungodly amount of vegetables alongside a small portion of meat!!! To see them enjoy one of my childhood treats is really gratifying. Enough to make me walk the lanes of Crawford Market to find some sizzler plates along with their wooden bases, to bring back home. Not only do they take up a lot of room in our bags, but weigh a ton! Blessedly, this is before draconian baggage rules are the norm. 


Touché was the first sizzler joint that I remember eating at. Located in ritzy Breach Candy, Bombay, adjacent to Bombelli's, another favorite. A patisserie and chocolatier, replete with angular glass counters filled with all the chocolate a child could dream off . As short as I was, I always stood on tiptoes to look for my favorite, an immense chocolate-scaled fish. Don't ask why that was my perennial choice. To me it was the largest piece of chocolate in the store! Touche was expensive for us youngsters on a slim allowance. And yet I scrimped and saved to treat myself to many a 'steamy' platter. Soon the rage caught on and Yoko and Kobe materialised. The sizzling floodgates opened at last!

 I start marinating chicken tenders. I must make sure that the lengthy list of veggies I need are in the house. The recipe calls for potatoes, cabbage, green beans, carrots, cauliflower, peas, tomatoes, onions and spinach. A healthy spectrum. Vitamin and beta-carotene overload. Most of these veggies reside in my fridge year round, but like the proverbial 'where are they when you really need them,' I find I will have to hit the stores. I do prep before I cook. I place the cooked veggies on a sheet pan for easier heating and plating. Salting the veggies as I cook then. The mustard sauce is must, especially sharp, nose-tingling Coleman's. If you have tasted Coleman's, then you know it is a far cry from American ball park mustard. And so on and on. Like I said, it is a lengthy list and prep. But worth the effort. A hundred-fold. After all, Shauna leaves us soon, so her requests are my command!

Sizzlers
Makes 4 servings
EF


4 Cast Iron oval Platters with wooden bases

1 1/2 pounds boneless skinless Chicken (Thighs, Tenders, Breast)
2 teaspoons Garlic powder
2 teaspoons Onion powder
2 tablespoons Soy sauce
3 tablespoons Worcestershire sauce
4 large Potatoes
Canola oil to fry potatoes
3 cups Cauliflower florets
4 Carrots
20 Green Beans
3 cups Peas
1 packet Baby Spinach leaves
1 tablespoon Butter
1 large Tomato
3 cups sliced Cabbage
2 Onions
4 tablespoons Canola oil
2 teaspoons Worcestershire sauce
1 teaspoon Soy sauce
Kosher salt


Start by marinating the chicken in garlic powder, onion powder, soy and Worcestershire sauces. Let the chicken marinate for at least 1 hour or up to 24 hours in the fridge. Bring to room temperature before you cook them.

Boil potatoes. Cool, peel and cut into fat wedges.

Deep fry wedges till brown and crusty. Drain well and lightly salt wedges. Place on a sheet pan.

Bring a large pot of water to boil. Salt the water lightly and add cauliflower florets. Boil for 5 to 7 minutes until tender. Remove with a slotted spoon, drain well and arrange on a sheet pan. Lightly salt.

Add the carrots to boiling water. Cook till crisp for 4 to 5 minutes. Remove the carrots with a slotted spoon and place next to the cauliflower. Lightly salt.

While cauliflower and carrots are cooking, trim green beans.

Add green beans to boiling water and cook for 3 minutes till crisp. Once again remove veggies with slotted spoon and place on the sheet pan. Lightly salt.

Peas go into the water. Turn off the flame and let the peas sit in hot water for 5 minutes. Drain in a colander, place on the sheet pan and lightly salt.

Put a non-stick saucepan on low fire. Add butter to pan and swirl to melt.

Add the spinach leaves to hot butter and saute well for 5 minutes or until spinach has wilted. Salt lightly and place on sheet pan.

Slice tomato into 4 thick slices and add to the saucepan. Let the tomato slices saute for 2 minutes. Remove and lightly salt.

Peel and cut onions into 1/4 inch slices.

Add 2 tablespoons of canola oil to the same pan. When the oil gets hot, add onion slices and saute for a few minutes.

Drop in the cabbage and saute.

Soy and Worcestershire sauces go into the onion cabbage mixture. Saute uncovered for 6 to 8 minutes. Place alongside veggies on sheet pan.

add caption

Add 2 more tablespoons of canola oil to pan. Crank up the flame to high.

Place the chicken in the oil and saute uncovered for 8 to 10 minutes or until chicken is brown and cooked.


Tomato Sauce
1 cup Tomato sauce or Ketchup
3 teaspoons Chile powder
2 teaspoons dark Soy sauce

Mix the above ingredients in a saucepan and bring to boil on a medium flame.

Mustard Sauce
3 tablespoons Coleman's Dry Mustard Powder ( it has to be a sharp nose-tingling mustard!)
1 to 2 tablespoons Water

Add water carefully to mustard powder to get a sauce of pouring consistency.


You can make all the above steps the morning of the meal, although everything tastes best freshly made.

When you are ready to serve, heat the oven to 400F.

Place the cast iron inserts in the oven for 20-25 minutes.

Alternatively you could place them on a hot gas grill for the same amount of time.

Cover the veggie-filled sheet pan loosely with foil.

Place pan in oven for 10 minutes to reheat veggies.

Start plating by removing  platters from the oven and placing them on  the wooden bases.

Cover the platter with 1/4 cup tomato sauce.


You have to work fast at this point. Start with putting a large spoonful of cabbage onion mixture.Next go the green beans, followed by carrots. Then place the cauliflower. Spinach is next. Peas have to be nestled in. Place the tomato slice anywhere. And potato wedges at the other end of the platter. Place the chicken on top of the veggies. This arrangement is just a guideline. Go with any kind of placement you deem fit! You should be hearing sizzling sounds when you start plating!!! If not, the platter isn't hot enough!!!


Pass the mustard sauce. You should dribble it carefully as it has a strong inflection!

Squirt tomato ketchup over the sizzler too!! It is another layer of taste added on!

Enjoy!!!


NOTES

Chicken is my meat of choice for today. Lamb, beef, hamburger or seafood is another option. Or you could go the with just veggies.


As far as the veggies go, these are the Indian choices. Feel free to substitute to your tastes.

I make Coleman's mustard using the powder. You could buy prepared Coleman's in bottles at grocery stores.

Tomato ketchup is another condiment we generally use along with the mustard.

Fajita platters could be used for sizzlers.


 Touche is long gone. Offsprings live on, popular as ever. Since we do not have an Indian sizzler near us, the kids have to do with my version. Cleaning up their plates is not such a herculean task in our house!!!


Wednesday, July 17, 2013

Swiss Chard Rice


I read that Swiss chard is good for me. Nutritious. A super food. So what am I saving rainbow chard in the fridge for?  I find it arranged in such attractive bunches at farmers markets. An eye-pleasing display of green, pink, yellow and white. Ordinary green bunches pale in comparison to the vividly colored spidery leaves. They look crisp, pristine, like edible green-maroon giant lollipops!


The food world extolls the virtues of chard. Along with spinach, blueberries, sweet potatoes they offer your body a healthy respite from other 'evil' temptations. I like the slightly sharp taste. I like that you can sauté them fast. I like that you could use the leaves as a wrap for fish and chicken. Hmm... should I resurrect an old recipe using fish? But I know I cannot. Dinner is almost ready and I need a fast side to go with pork chili verde tacos. Chard gets a wash, dry and cut. Garlic gets slivered. Rice gets a rinse. I could be talking about a beauty salon !!!! Chard and rice, a tasty marriage, a quick side.


Swiss Chard with Rice
Makes 2 to 3 generous portions
DF, GF, VN, WF, VG, EF


2 cups thinly sliced Swiss Chard ( Rainbow or Green)
2 cloves Garlic
1/2 Onion
1 green Chili
3/4 cup Rice
2 tablespoons Canola oil 
1 teaspoon Kosher salt
1/2 teaspoon ground Black pepper
1 1/2 cups Water


Wash and drip dry the chard.

Peel and slice the garlic into thin slivers.

Trim the chile and slice in half.

Cut onion into thin slices.

Wash rice well and drain.

Heat oil in a saucepan. 

Drop in the garlic slivers, onion slices and green chile and sauté for a few minutes. 


Add the chard and let it wilt for a few minutes.

Scrape the rice in and sauté for 2 to 3 minutes.

 Spot the Pork Chile Verde!

Season with salt and pepper.

Add the water and bring to a boil. Cover, turn the flame down to the lowest degree and cook for 14 minutes.

Remove the lid and fluff rice before you serve it.

If you don't want to eat the chiles, just remove them before you serve the rice.


NOTES

Spinach or escarole could be easily substituted for chard.

I use Basmati rice. Any rice could be used.

Leftovers make a wonderful filling for burritos. Just add some grated pepper jack to the filling.


Pork tacos are filled. Rice is spooned onto plates. A chile has been eaten inadvertently. Not much remains in the bowl by way of leftovers. Healthy and tasty! Yay for Swiss chard.


Sunday, July 14, 2013

Salad Days--Watermelon Avocado Salad


Watermelon along with tomatoes is the quintessential reminder of summer. Half-circle slices cry out to take a bite out of their centers. Wedges on beds of ice, entice fingers to pick them up. Chunks sit in their juices. Waiting for a turn in the blender. Waiting to be forked. Tempting me all summer long. 

The one sitting in my fridge is a baby. A thin rind  small green ball. Sugar sweet. Pinkish red. Very few seeds. So it makes my life easier. Though I like cutting chunks and poking out seeds. One of those tasks that you don't mind doing. I love the feeling of slippery seeds running through my juice covered fingers. Sometimes mindless tasks give the most pleasure. 

Watermelons of my youth were mostly sold by dusty roadsides. You spied a giant mound of dark green. The car screeched to a stop. You knocked hard on the rind to find a good one. You had the seller cut out a small wedge to see if the insides were as red as he claimed they were. Most often that wasn't the case! The next task was to find one that wasn't already cut into. Then came the haggling. Hey, you never pay full price in India! Those watermelons were chockfull of big black seeds. As a treat we were allowed to cut wedges and spit the seeds out at the dining table. What fun that was! God forbid if you swallowed a seed! Grandmothers wove yarns of watermelon vines growing out of all facial orifices, scaring the bejesus out of us kids!! Wonderful memories of an unspoiled era.

Most of my watermelons gets eaten chilled. Some watermelon goes into a salad with feta and mint. Some I grill, fire-tinged small wedges speckled with goat cheese crumbles. This week I try an Asian twist. With a spicy dressing. I love it. So I make it again. The table questions my choice. Then again I fall back on my favorite--- chef rules. The first time around, the salad is a perfect foil for spicy Thai noodles. The second time around it pairs well with beef sate. It is my new favorite.


Watermelon and Avocado Salad with Spicy Dressing
Serves 4

3 cups Watermelon chunks 
2 small Haas Avocados
1/2 teaspoon Lime zest
2 teaspoons Lime juice
1 tablespoon Sriracha or any Chili sauce
1 teaspoon Fish sauce
8 Mint leaves
10- 12 Thai Basil leaves


Place the watermelon chunks in a bowl.


Cut avocado into small pieces and add to watermelon.

Whisk lime zest, lime juice, Sriracha and fish sauce in a separate bowl.

Wash, dry and tear the mint into small shreds. Or make a chiffonade of mint with a knife.

Pick the basil leaves off the stems.


Pour dressing over watermelon.

Add the mint leaves and Thai basil.

Toss and serve immediately.


NOTES

This salad needs to be eaten as soon as you toss it. It's one of those salads that will stay for a while but becomes watery as it sits.

Feel free to add herbs of your choice to the mix. Cilantro and regular basil taste good too.


Twice made and twice devoured!! No complaints!!! Summer in your mouth with a spicy kick. 


Monday, July 8, 2013

A Fryer's Siren Song- Crisp Fried Arbi


It's hot enough to fry an egg on the sidewalk. Then why am I in the mood to fry? You know what they say about mad dogs and Englishmen? I guess the same can apply to me. I really am in the mood to eat fried arbi. Arbi you ask??? What is that? The root of the colocasia plant I say!!! Another tater of sorts. And I do love taters. Fried arbi has a big fan following in this home. But let's start with arbi 101. This root goes by many names. Yautia in Spanish. Arbi in Hindi. Alu in Marathi. Taro in Hawaii. Colocasia as it is botanically called, is rather popular in India. Almost every Indian state has a name for it, too many to list. The roots of course are edible, and so are the leaves. Those you have to clean carefully as they have an itchy element in the stems. I cook them down like collard greens, that means cooked to death. They are also stuffed, rolled, steamed and sauted. These little rolls are called patvad in Maharashtra or patra in Gujarat. Both equally delicious. A subject for another day. Lets get to the root of my temptation!

Colocacia roots are plentiful in Asian, Indian and Spanish grocery stores. You keep them in a dark, cool ventilated spot. I usually start by boiling them. Once boiled, they keep for a few days in the fridge. I make a subji or stir fry that goes well with dal or roti. If you have had the much reviled poi, you might have an insight into its mushy texture. The Hawaiians boil the life out of these roots and mash it into a paste. I don't boil them that long so mine have a little tooth to their bites. This is the Sindhi version called Arbi Tuk aka double fried delight.


Fried Arbi
Makes 4 generous servings

4 pieces of Arbi or Colocasia root
Canola oil for deep frying
2 tablespoons Chile powder
2 teaspoons Kosher salt


Put the roots into a saucepan, cover with water and place on heat. 

Boil on a medium flame for 10 to 15 minutes. Pierce the roots with a knife to see if they are done. If the knife slips in easily they are ready. I give you a range of times as it depends on the size of the roots. Slim ones cook faster. Fat ones take longer.

Remove from water and cool.


Make a small slit with a knife. The skin should slip off. You might have to pare off stubborn bits.


Let the roots cool completely before you cut them. Half hour in the fridge is perfect.

Mix the chile powder and salt in a shallow bowl. It seems an excessive amount but the slices need the punch.


Heat canola oil in a kadhai or wok or a deep sided saucepan or a deep fat fryer. Your pick!

Cut the roots 1/2 inch thick. 

Test the oil but dropping in a sliver of a root. It should spring right back up to the surface and sizzle.

Gently add the slices to hot oil. Do not crowd the slices so do four or five at a time.

Let then fry for 4 to 5 minutes on a medium flame. You want them to turn a pale gold color.

Remove them with spider or slotted spoon on to paper towels. 


Take one slice and place it in a tostones smasher.


If you don't have one then gently press a small plate on to the slice. You want to smash it just a bit. 


 Smooshed!


Return the smooshed slices back for a second fry, this time raising the flame to medium high. You want the slices to crisp up fast. Fry them for 2 to 3 minutes. 

Take the slices out of the oil and once again drain them on paper towels. 

Sprinkle the slices liberally on  both sides with the chile powder/salt mixture. The powders should adhere to both sides. So press the mixture onto slices. 


They taste best hot, but room temperature is ok too. 


NOTES

Smooshing and frying the slices twice gives the slices a crispy outer crust and a creamy interior.

Unlike potatoes, arbi has a rougher thicker skin. Once boiled the skin comes off very easily.

You could make the same recipe using potatoes too. 

I use chile and salt very liberally. You could definitely tone it down to your taste. The roots on their own are rather bland so it needs that spicy salty kick.


Frying and all that salt!!!! I forget all the cholesterol hype for this evening. I feel a little masochist. Then I could also be that spoiled brat who gets whatever she wants. Hey, the frying pan is usually relegated to the back of the cupboard. Today I answered its siren song. Tomorrow it's back to salad!

Friday, July 5, 2013

Spice Dream- Lamb Korma


I haven't made a curry in a while. I miss it. I miss the aroma of roasting spices. I miss the hissing of frying onions. I miss rice and curry. I know the family does too. I defrost some lamb. Some say it tastes gamey. Could be. It does have a stronger flavors than beef or chicken. The family likes their lamb with bones, especiallly bones with marrow. Nalli as its called in Hindi, usually ends up on my husband's plate. Mutton would be my meat of choice. The halal butchers are a half hour ride away and the lamb sits in my freezer. Easy choice! 

As it is when I cook meat, I open a plethora of cookbooks. Always a pleasurable chore. You know how you have a handful of recipes you know by heart. They are the ones you go to when you don't have enough time, or it is the first recipe that comes to mind, or it is the easy way out that you don't want to think up something complicated. That is not the case today . Today I feel like eating something I havent had before. I reject a few recipes that call for grated fresh coconut. The grated coconut is hard as rock in my freezer. Of course I am very "grateful"for having this essential iingredient in my freezer! Gone are the days when I had to crack open a fresh coconut, clamp on the unwieldy coconut grater and freeze finely grated coconut for a rainy day. Nowadays you can find frozen grated coconut, frozen sliced coconut chips, frozen coconut strips at Indian grocery stores. Coconut every which way you can!!! A decade ago I was buying bearded brown coconuts by the handful. Now it's an easy reach into the freezer! But as I haven't defrosted any. I find a recipe using dried coconut. Much easier. and tastes just as good.

Korma is a North Indian version of curry. It usually calls for some kind of nut paste. Since nuts are taboo for my kids I omit them. The kitchen is redolent with the aroma of freshly ground spices. Lamb gets a mini marinade session in yogurt.  Onions sizzle, garlic splutters and the spice paste gets a workout in the pressure pan. I'm using a pressure pan because its faster than letting the lamb cook stovetop. I will sacrifice some texture issues but it is late and I need to get going! It's 15 minutes in a pressure cooker versus 45 minutes stovetop!! 


Lamb Korma
Serves 4 people


1 pound Lamb shoulder (see Notes)
1/2 cup Yogurt
3 tablespoons Canola oil
1 cup Cilantro
3 green Chiles
5 cloves of Garlic
4 thin coins of Ginger
2 tablespoons whole Coriander seeds
1 teaspoon Chile powder 
1/2 teaspoon Turmeric powder
1/2 cup dried flaked unsweetened Coconut
1/2 cup Water
2 large Onion
1 teaspoon Kosher salt
3/4 cup Water
1/2 teaspoon Garam masala
Cilantro to garnish 

Wash, trim fat and cut the lamb into 1 inch chunks. Keep some meat on the bones. Do use the bones as they provide an intense flavor to the gravy. 

Whisk yogurt in a bowl and mix in lamb pieces. Keep aside for 30 minutes.


Start on the spice paste. Peel garlic.

Trim and cut green chiles into 1 inch pieces.

Peel ginger slices.

Put garlic, cilantro, green chiles, coriander seeds, chile powder, turmeric powder and coconut in a blender with the 1/2 cup of water. Grind till you have a smooth paste. You might have to push the paste down in the  blender a few times. You could use a food processor too. I find the blender gives the paste a smoother texture. The spice mixture should be thick, not liquidy.


Peel and thinly slice the onions.

Heat canola oil in a pressure cooker. If you are not using a pressure cooker, a Dutch oven or deep sided heavy bottomed saucepan will work just as well. ( look at NOTES for directions)

Add sliced onion to hot oil and let the onions get golden brown.

Add the spice paste in at this point, lower heat and let the spice paste sauté well for 5 minutes. You should be able to see small oil bubbles in the bottom of the pan. It's the oil separating from the spice paste. 


At this point the lamb goes in now along with the remaining water and salt. 

Let the gravy come a boil. Put the pressure cooker lid on and cover the opening with the whistle contraption. You are supposed to wait until steam rises from the opening and then close the opening. But I am a veteran of many pressure cooker disasters and have learnt to place the whistle on top of the opening right from the start. 


The whistle will wiggle and let out a piercing whistle-like sound. Now turn the flame to the lowest point  and cook undisturbed for 15 minutes. 

Turn off the flame after 15 minutes and let the pressure cooker sit for another 10 minutes to decompress. If you are in a real hurry, run some cold water over the pressure cooker for 3 to 5 minutes and then open the top.

Open carefully as a lot of steam will escape.

Sprinkle garam masala and cilantro and serve the curry with either rice or roti.


NOTES

I use lamb shoulder steaks, either the round bone or shoulder bone cuts. You could use lamb neck but I think it is too fatty. Trim the fat and cut the lamb into chunks. Use the bones especially with meat attached to it. The meat tastes wonderful cooked on the bone.

As I said , you don't have to use a pressure cooker. If you cook the lamb stovetop, just add more water and cover tightly. Lower the flame to medium and stir the curry now and them. It should take 40 - 45 minutes. I find the texture of lamb cooked this way a little different. The meat tends to shred better.

I have had many mishaps with my pressure cooker! But I still persevere. It really is the fastest way to put a lamb or mutton curry on the table. Presurre cookers come in a broad spectrum of sizes, shapes and work ethics! I use a Prestige Pressure Pan. Amazon sells them in the US. It is kind of old world style, not like the modern Fagor. Just follow the manuals and you should be fine.

Mutton takes the same time to cook as lamb.

The korma is a great make-ahead curry. You could make it two days ahead and keep it in the fridge. Refresh with cilantro just before you serve it.


Rice is steaming. Phulkas are rolled and flame puffed. Marrow spoons sit by plates. Oh yes, in India we have special stainless steel devices to dig out tasty marrow bits.


You cant really call it a spoon, more a slender, flat, steel skewer, able to penetrate the narrow bones. I forgo a fork and spoon for the primal utensil, my fingers. I am sure it will be a finger-licking meal.