Wednesday, July 29, 2015

Cherry Tomato and Green Bean Salad


I invent summer from my own private CSA...right outside the kitchen. It gives me no amount of pleasure to look at the verdant patch from my perch in the kitchen. I revel in picking yellow beans minutes before I blanch them.  I leave bees in zucchini flowers, staking their claim to pollen.With a basket in hand, I pluck bowlfuls of Sun Golds, San Marzanos and heirlooms every morning. Summer issues of food magazines turn out a myriad of tomato recipes. I weave between gazpacho and salad......Salad wins by the length of ease! 


Water boils. Beans are picked. Plump small yellow cherry tomatoes are washed and halved. Dressing is shaken in a glass jar with minimal effort. The time between the call to dinner and the actual appearance of family, is all it takes to put together this simple salad. 


CHERRY TOMATO AND GREEN BEAN SALAD 
Serves 2-3


1/2 cup Sun Gold Cherry Tomatoes or any other small Tomatoes 
A large fistful thin Green Beans 
1/4 cup extra virgin Olive Oil
1/4 teaspoon grainy Dijon Mustard
Juice of 1/2 Lemon
A large pinch Kosher Salt
Freshly ground Black Pepper
1/4 teaspoon Soy Sauce
1/2 teaspoon toasted Sesame Seeds
1 tablespoon crisp fried Shallots 


Bring a pot of salted water to boil. Add green beans and let beans boil for 1 minutes. Remove from water and  run beans under cold water. Set aside.

Mix olive oil, mustard, lemon juice, salt, pepper, soy sauce and sesame seeds in a jar. Screw lid on and shake vigorously. Or use a bottle. Or a bowl.


Wash and halve cherry tomatoes.

Arrange beans and tomatoes on a platter. 

Drizzle dressing generously over veggies, top with crisp shallots and eat! 


Notes

Leftover dressing can be refrigerated.

I keep crisp fried shallots in my fridge at all times. You could very well leave them out.


It's about the freshness in every bite. It's knowing that you can fearlessly eat what you grow. It's a matter of stepping out to get your dinner. Crunchy beans, sugar sweet cherry tomatoes and a lemony dressing....I cannot go wrong. With no GMO's to be found, but I live happily with these simple gifts of summer.


Sunday, July 26, 2015

Pan Fried Potatoes in Duck Fat


I get my summer wish..sitting outside, a glass of red in hand, cool breezes wafting over us and the smell of steak grilling. I take every pleasant evening as a gift, transferring cutlery and crockery to my outdoor table. Food just tastes different outside. Better. More flavorful.

G stars the grill and seasons a porterhouse. And what goes best with steak? Potatoes of course. It's usually a mash or sautéed chunks in butter. But today feels special. I boil some small Yukon Golds. I reach into the depths of the fridge to uncover a container of duck fat. It sits waiting for occasions like this. Heaping tablespoons go into a flaming hot cast iron pan, along with boiled and halved potatoes. Try to source out duck fat. A little goes a long way in taste. In the time it takes for steak to be cooked, the potatoes are done.


PAN FRIED POTATOES IN DUCK FAT
Serves 2


10 small Yukon Gold Potatoes 
3 tablespoons Duck Fat
1/2 teaspoon Kosher Salt
1/2 teaspoon fresh cracked Black Pepper

Wash potatoes. Put them in a pot and cover with water. Boil 10-12 minutes till done. Drain and cool. Cut them in half or quarters. The more surface area, the crustier the potato.

Heat a cast iron pan over high heat till really hot.

Drop spoonfuls of duck fat into pan and let it heat up for a few seconds.

Add potatoes to hot fat and let them sizzle and brown.


Season with salt and pepper.

Fry potatoes uncovered, turning them often till they are deep brown and crusty.


Eat them right out of the pan or plate them with steak!


NOTES

Duck fat keeps very well in the fridge. 


Simplicity personified, these potatoes are addictive as hell! I start my feast from the pan. Grillsmoke tells me steak and shishito peppers are ready. Steak rests as I finish frying potatoes. On to the platter and into potato heaven we go! These buttery Golds are a mouthful of crispy softness. Try these at least once. And once eaten I'm sure you will go back to that special place often.


Thursday, July 23, 2015

Summer Squash Soup


Alliteration works fine with this simply satisfying summer soup. Zucchini abounds in my garden this year. Every morning I am rewarded with numerous splayed yellow blooms, holding the promise of dark green fruit. I pick flowers and vegetables regularly.

My dear dear friend Colleen's birthday is celebrated with lunch and a movie. After much protesting she agrees to let me entertain her. For me, the thrill is in the planning. I ferret through a bunch of recipes hoping she will like the menu. Since she is not a big fan of tongue burning flavors so we grill spicy chorizo sliders. A salad comprises of home-grown pale yellow green beans and bright orange Sun Gold tomatoes, assisted by grilled corn, cucumber and peas. All these sit on a bed of peppery arugula. Colleen has made positive noises about okonomiyaki, so I make these small cabbage, carrot and kale fritters. And to start, a cold zucchini soup.


SUMMER SQUASH SOUP
Makes 5-6 shooters glasses or 2 first course portions
GF(NO BREAD), WF. VG.EF


2 Zucchini
1 teaspoon Olive Oil
2 cloves Garlic
3/4 cup Chicken stock
1/4 teaspoon Kosher Salt 
1/4 teaspoon fresh cracked Black Pepper
1/4 cup Milk
Sourdough Bread, sliced, toasted and cut into fingers


Wash, trim ends and chop zucchini into small chunks.

Peel and sliver garlic.


Heat olive oil in a saucepan.

Add garlic to flavor oil. Let garlic sizzle for 30 seconds.

Drop zucchini into oil and stir.


Pour stock and seasonings onto zucchini and bring to a boil. Lower heat. Cover and let zucchini cook for 15 minutes. Take off the fire and cool for 10 minutes.


Puree cooked zucchini and stock in  a blender.


Pour puree into a bowl and add milk. Stir to mix. 

Chill in fridge for 3-4 hours or overnight.

Pour into small shooter glasses.


Arrange a finger of toasted sourdough with soup and served chilled. 

Or serve in a bowl as a first course.


NOTES

You could very well serve this soup hot in winter months. Zucchini is available thought out the year.

You can use yellow summer squash. Of course the end result will be a different colored soup.


I plan an alfresco lunch but the blistering heat makes us revert to airconditioning. Soup shooters with chewy sourdough are a light antidote in hot weather. Sliders, salad and slivered cabbage okonomiyaki are loved by Colleen, Keith and Mel. Cooking for Col is a labor of love. Savoring this summer spread sets us in a super mood for sleuthing! 


Tuesday, July 21, 2015

Cutlets and Gravy Parsi Style


An abundance of mint gives me scores of ideas. I use leaves in pasta, salads and a good many Indian foods. Mint in one's mouth is a fresh, herbaceous taste. Chiffonaded into meatballs, it underwhelms, providing a hint of herb with each bite. I feel the need to use copious amounts today.

A much thumbed Time and Talents Cookbook is my source and inspiration. The Parsi food section has been most popular. In my usual fashion I chop and change bits of the recipe. My kitchen life is determined on the ease of prep. I know...some recipes are convoluted, but quite delicious. And I do undertake those, but at six in the evening I need to chop chop! Ground beef replaces mutton kheema, frozen garden tomatoes in place of fresh ones, a whole bunch of mint and so it goes.


CUTLETS AND GRAVY PARSI STYLE
Serves 4

1 pound ground Beef
1 Egg
3/4 cup Mint leaves
1/2 cup Cilantro 
1 Green Chile
1 small Potato, boiled
1/2 teaspoon Garlic paste
1/2 teaspoon Ginger paste
1/2 teaspoon Coriander powder
3/4 teaspoon Kosher Salt
3-4 tablespoons Flour
3-4 tablespoons Canola Oil
4 fairly large Tomatoes
2 dried Chiles
1 small stick Cinnamon 
3 Cloves 
1/2 teaspoon Garlic paste
1/2 teaspoon Ginger paste 
1/2 teaspoon Kosher Salt
2 tablespoons Vinegar
1 teaspoon Jaggery or Brown Sugar
Chopped fresh Cilantro 


Start with the gravy. 

Chop tomatoes and put them in a pan.

Drop dried chiles, cinnamon, cloves, garlic and ginger pastes and salt into tomatoes and place over medium heat. Bring to boil, cover pan, lower flame and simmer for 15-20 minutes. You should have a thick sauce.


Remove cinnamon stick and cloves.

Add vinegar and jaggery and continue to simmer for another 10 minutes, stirring every now and then. Keep warm till cutlets are done.

Put ground beef in a bowl.

Break egg onto beef.

Wash and dry mint and cilantro. Cut into thin slivers and add to beef.

Slice green chile very fine and add to beef.

Cut boiled potato into 1/4 inch cubes and add to beef.

Add garlic and ginger paste, coriander powder and salt. Use your hands to mix the beef. 


Form beef into small patties 1 1/2 inches wide.  

Heat a few tablespoons of canola oil in a nonstick pan.

Spread flour on a flat surface. Dust both sides of each patty lightly in flour and place in the hot pan.


Brown on both sides.


Arrange browned cutlets on a platter and pour warm gravy over them. 

Finish with cilantro.


Dinner is done and leftovers go into the fridge. Cutlets and gravy are resurrected the next day, over pasta, for lunch. I am told the Indo-Italian version tastes better! There are truly no bounds to culinary convention in this house! Yet another newly minted recipe added to my repertoire.


Thursday, July 16, 2015

Fava Bean Salad


The kitchen feels like one big sauna. A hint of a breeze does not give an ounce of relief. Through this heat wave, I decide to boil and peel favas. A most tiresome task in my prep book, but the most delicious bean in my culinary repertoire. Verdantly green, any recipe involving favas excites me, entices me. Big fat pods yield Lima-like beans. And just like the Russian dolls, a short boil reveals the heart, a tender green kidney-shaped kernel. I do say it is a tiresome task, but the result is oh so rewarding. 

Fresh favas are found in Middle Eastern stores, some Spanish ones and gourmet grocery stores. They look like overgrown green beans. The thick, leathery pods are shucked. The beans are then boiled for a few minutes. The bigger the bean, the longer the boil, is my rule of thumb. Shocked in ice-cold water, they retain their green color. The peel slips off and you are left with a tender, pistachio colored bean in your hand. Bathed in fruity olive oil, lemon zest and fresh herbs, these beans evoke all things Mediterranean. 


Spring and summer finds me combing markets for favas. Other months, I buy not so nice frozen ones. Then I find frozen beans at Trader Joes and that makes me do a happy dance. These look and taste like fresh ones! And I have one less step to do....no more peeling pods! Instructions on the packaging tell you to boil and eat. But I do not care for the tough outer covering, so it is still boil and peel for me. 


FAVA BEAN SALAD
Makes 2 generous portions 


1 pound fresh Fava Beans or 1 10 oz package frozen Fava Beans
2-3 tablespoons extra virgin Olive Oil
1 teaspoon Lemon zest
2 tablespoons Tarragon
4 tablespoons Italian Parsley 
1 teaspoon Thyme leaves
1/2 + 1/2 teaspoon Kosher Salt
1/2 teaspoon fresh cracked Black Pepper 


If you are using fresh favas, start by shucking the pods to get to the beans. If you use frozen ones follow the next step.

Put 3-4 cups water in a saucepan and bring to a rolling boil. Add 1/2 teaspoon salt.

Drop favas into boiling water and cook for 2-3 minutes. If the favas are large, cook for a minute more.

Drain and drop favas into a bowl of ice water.

Let favas sit in ice water till cool. Drain.

Peel the tough outer skin. 


Place favas in a bowl.

Chop tarragon, parsley and thyme fine and add to favas.

Drizzle olive oil, lemon zest, salt and pepper, stir to mix and let flavors meld for 15 minutes or until ready to serve.


Favas are the greens to steak and potatoes today. That vivid color so pleases my eyes as I fork some. The beans have a peppery, buttery flavor. California olive oil, herbs from my garden and lemon zest lets me savor each mouthful. My advise to you.... scour markets, frozen food aisles... find them. Or else...be green with envy!


Sunday, July 12, 2015

Dahi Pakodi


Who can resist chaat? Not me. This slice of life from life in India, is resurrected ever so often in my kitchen. Chaat?? The uninitiated may ask what it is? This is an amalgam of street food, small plates eaten tapas style, all day long, in India. Spicy flavored water or paani, ladled into potatoes and crisp pooris, frankies or layered parathas rolled with beef, masala mini idlis, ragda pattice or potato tikki with creamy beans and dahi pakodi or crisp pakodas blanketed in yogurt and tamarind chutney. Then there is bhelpoori, sev poori, dahi batata poori....I skim the surface and also replicate some for dinner.

Geets is visiting. A bunch of old friends gather to reminisce and reinforce friendships that stand the test of time. Vimal, Lygia, MaryLou, Jen, Colleen and Anu laugh heartily, walk down memory lane fondly,  over wine and food. A round of paani poori is disappears fast. Chutney naan triangles that Geets makes, are also polished off. Chaat lures them to the table. My menu has undergone  numerous changes. I waffle between choices as Geets berates me for my indecision. We finally decide on frankies, ragda pattice and dahi pakodi. Leftover shrimp quiche is resurrected. Squash blossoms are filled with paneer and chaat masala and crisp fried, a true garden to table venture. We decide on mini masala idlis. They turn out into perfect small rounds with Geets' precise technique. She asks for an old favorite, dahi pakodi. I diligently oblige. 

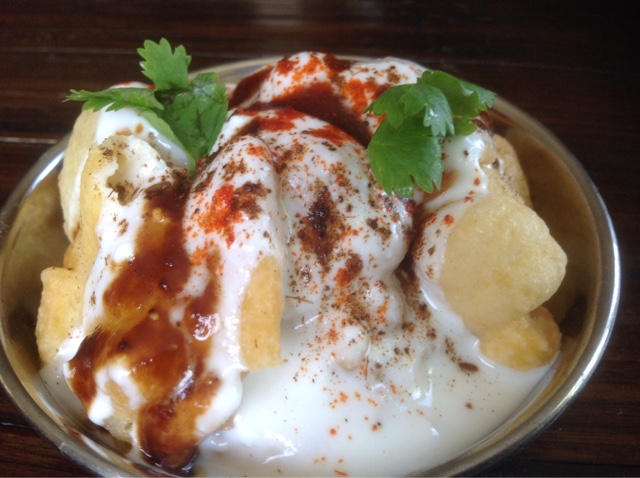
Th origin of this recipe goes back some forty years. It is a sensory flashback to my old workplace, Contemporary Arts and Crafts in Bombay. Along with the mid-morning chai break, a colleague who name eludes me, brings in these light, puffy fried morsels, swimming in yogurt, tamarind chutney and spices. We hungrily devour spoonfuls. She happily volunteers the recipe. Which now is cemented in my memory. These pakodi have emerged as a tea time treat, lunch on many occasions and as part of a chaat menu. What makes them appetizing is the light, fluffy fritter. Equal parts of flour and chickpea flour are whisked with a pinch of baking soda and water into a thick batter. They fry up into airy, pale brown crisp morsels. Once fried they get a short dunk in water. Squeezed dry, I arrange them on a platter. Covered with yogurt, chutney and roasted cumin powder, they resemble dahi vadas but without the heavy texture. On this hot day, a cool bite of dahi and pakodi is temptation enough.


DAHI PAKODI
Serves 4-6


3 heaping tablespoons Flour
3 heaping tablespoons Chickpea Flour or Besan
A pinch of Baking Soda
A pinch of Kosher Salt
1/3-1/2 cup Water 
1 1/2 cups Canola Oil
1 cup Yogurt
1/4 cup Water
A large pinch of Kosher Salt
3-4 tablespoons Tamarind Chutney (Recipe Below)
1/2 teaspoon Chile powder
1/2 teaspoon roasted Cumin powder
Cilantro to garnish 

Whisk flour, chickpea flour, baking soda and salt in a bowl. 

Slowly whisk in water till you get a thick batter. Batter should be thick enough to drop spoonfuls into oil. This is an eyeball experience. If your batter is thin, add small but equal amounts of flour and chickpea flour to thicken. It should be of a thick, pouring consistency.


Heat oil in deep frying pan or wok over medium high heat. Drop a tiny bit of batter to test oil. It should sizzle and rise to the surface immediately.  Drop a tablespoon of batter at a time into hot oil. Depending on the size of the frypan or wok you could fry 8-10 pakodi or fritters at a time. They should puff up immeadiately.


Fry pakodis till they are slightly golden, stirring often. Drain on paper towels and keep aside. Finish frying all the batter.


Whisk yogurt with 1/4 cup water and salt.

Put fried pakodis in a large bowl and cover with cold water for a minute. Take one pakodi  and squeeze water out with your palms and keep aside. Working fast, do the same for all the pakodi.


Start assembly by placing pakodi in a shallow plate. Pour yogurt all over pakodi. Drizzle tamarind chutney over yogurt. Sprinkle with chile powder and cumin powder. Garnish with cilantro and serve it up.


NOTES

Tamarind Chutney 
 Makes 2 cups
1 cup Tamarind pulp
2 cups Water
1/2 cup Jaggery or Brown Sugar
A pinch of Kosher Salt.

Soak tamarind in water for 3 to 4 hours.

Squeeze pulp well and strain into a saucepan. You should have just the liquid. No pulp.

Add jaggery and salt and simmer on a medium flame for 15 minutes or until the sauce thickens.

Store in a glass jar or plastic container in the fridge for up to a month.


Eight ladies make a great deal of chatter. Platters are passed around. The room is filled with the sounds of friendship. Colleen's pista kulfi gives spicy mouthfuls a cooling antidote! Chaat is eaten standing on city sidewalks, table side in small cafes and in most Indian home kitchens. These small plates bring forth a flood of food-related memories.  It transports us across the seas to a world we have left behind. And then brings us right back where we belong.


Monday, July 6, 2015

Squash Blossom Fritters


My zucchini is in full bloom. Sprays of yellow greet me every morning. Some flowers are attached to burgeoning squash, whilst other blooms wait to be stuffed and fried. At least, that is the imagined thought. A few years ago I spent an arm and a leg on squash blossoms at Whole Foods. Now four healthy plants give me immense satisfaction. 

I send Shauna, Geets and Nikita a flowery picture in anticipation of their visit. Prompt replies come from the first two. Nikita says "what's that?" She is now visiting and I am determined to make some for her. I pick a bunch of flowers in the morning. They close up by afternoon. I make a batter with eggs, flour and white wine. I stuff the flowers with goat cheese and sourdough. Then it's fry time.


SQUASH BLOSSOM FRITTERS
Serves 5-6

10 Squash Blossoms, preferably with stems
1/2 cup Goat Cheese
1 slice Sourdough Bread
1/4 teaspoon Kosher Salt
1/2 teaspoon ground Black Pepper 
1 Egg
1/4 cup Flour
1/4 cup White Wine
1 cup Canola Oil


Break egg into a bowl and whisk well.

Add flour and white wine to egg and whisk till there are no lumps in the batter.


Wipe flowers. Make sure there are no ants inside the blossoms. 

Mash goat cheese till fairly smooth.

Trim crusts from bread slice and cut into 1/4 inch cubes.  Dampen then with a little water and mash into goat cheese.

Season goat cheese with salt and pepper. 


Divide cheese into 10 portions. Roll each portion into an oblong shape. 

Open squash blossoms and carefully stuff with goat cheese portion. 


Heat oil in a wok or frying pan on a high flame. Test oil with a drop of batter. It should sizzle and rise tothe surface immediately.

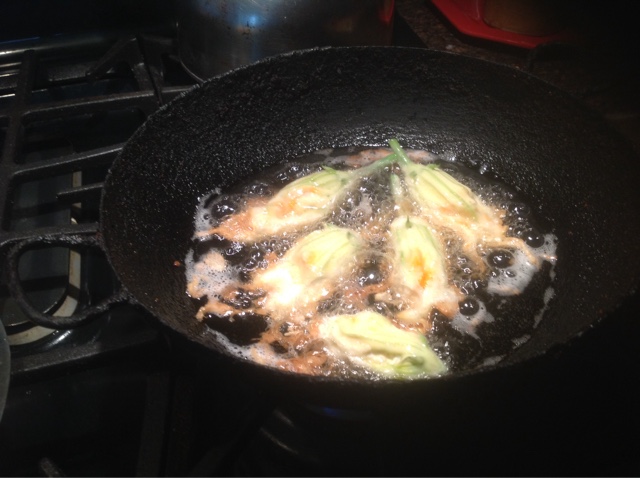
Hold squash blossom stem, dip blossom in batter and gently drop it into hot oil. 


Fry till brown and then flip fritter over and fry the other side for a few minutes.


Eat fritters warm.


I know now that a plateful of fritters will not appease the hungry and the uninitiated!!! This is the perfect finger food, crunchy, savory, gone in two bites. Nikita enjoys her first stuffed blossom. Then another and another. I'm happy she enjoys the bounty from my garden. Delicious, these blossoms take a little effort. If you think otherwise, squash that thought!