Monday, September 29, 2014

Coffee Tortoni


There is a point in your life when you make the same dish over and over again, it is no longer delectable to your palate. I have been making coffee tortoni for almost 40 years. A family favorite, the recipe comes from my mum's  Better Homes & Garden dessert cookbook from the 1970's. In my youth I was left in charge of dessert. Hence this easy version of frozen coffee and cream was a snap! Now all desire to eat this has long since evaporated. Sadly, it's only me who has tired of it. Everyone else laps it up. Consumes heaped bowlfuls of creamy fluff with gusto and relish. So I continue to oblige.

One such attempt results in the glass bowl slipping out of my hands as I remove it from the freezer. It falls to the linoleum floor and shatters. Coffee tortoni splatters in semi circle around the fridge. Geets and I watch in horror. Some dessert stays in the partially intact portion of the bowl. We agonize about the merits of rescuing some part of the dessert. John seconds that notion heartily. After all this has been steadfastly been his favorite. I hesitantly scoop some into another container. I spoon some into a bowl for John with many reservations. He eats several spoonfuls, savoring the flavors. Then I see him making a face. Scrunching his mouth. He puts a finger to his lips and removes a shard of glass. And another. And another. All the while blissfully continuing to eat spoonfuls!!! I apologise profusely. Apology accepted, he is determined not to waste any. Such is the power of this dessert!!!

Like all things that are not so good for you, this one is an amalgam of eggs, cream and sugar!! It assembles in a jiffy. Eggs get separated. Whites are beaten till fluffy. Cream is beaten into soft pillows. Granules of coffee leave brown trails on white. I add pan-roasted almonds and coconut. A quick fold and into the freezer it goes.

COFFEE TORTONI
Serves 4-6

2 Egg Whites at room temperature
4 tablespoons Sugar
2 cups Cream
4 tablespoon instant Coffee granules
1 teaspoon Vanilla Extract
1/2 cup Sugar
1/4 cup sliced Almonds
1/4 cup desiccated Coconut


Place a pan over medium heat and dry roast almond slices till they are toasty and brown. Watch carefully as they brown real fast. Remove from pan and spread on a plate to cool.

Dry roast desiccated coconut in the same fashion and add to almonds on plate. Let coconut cool.

Mix almonds and coconut together.


Beat egg whites with a hand-held electric mixer till soft peaks form.


Add 4 tablespoons of sugar and beat till stiff peaks form.


Put the bowl into the freezer till you are ready to fold into the cream.

Do not wash the mixer blades.

Pour cream into a large mixing bowl, preferably one with deep sides. The cream will splatter when you start whipping so a deep sided bowl will minimize splatter!

Whisk cream using the same mixer blades till the cream is thick for about 2-3 minutes. Ideally, it should stay on the spatula and not slide off.


Add coffee granules, vanilla and 1/2 cup sugar. Gently fold in to distribute.


Remove egg whites from freezer and fold gently into cream. Do this carefully as you do not want to lose that puffy texture. The less you fold, the airier the frozen dessert will be.


Fold 1/2 of the almond coconut mixture to cream.


Spoon into a glass dish. 

Sprinkle remaining almonds and coconut over mixture.

Cover with cling film and freeze for 3-4 hours till firm.


Serve cold.


I must confess I have made this dessert twice in the past three days. Even as the first bowl is thoroughly scraped I set about making the second helping. This too will disappear without much ado. I bring the frosty bowl for my guests. Spoons slide easily into soft fluffy portions. A strong coffee flavor pervades. Toasted almonds and coconut flakes make for nice crunch. We debate the virtues of tortoni vs ice cream as I refer to desert as ice cream. My mistake. It isn't. No churning involved. No egg yolks. So I hesitantly call it a semifreddo. This too isn't quite right. So coffee tortoni it is. Who am I to change four decades of perfection?


Saturday, September 20, 2014

Lemon Thyme Roast Chicken


My romance with Yotam Ottolenghi's recipes is the gift that keeps giving.  I love his bold flavors, his generously spiced meats and veggies. A master at adventurous pairings, he always surprises my palate. His treatise on food in Jerusalem makes me want to eat my way through the Holy Land. I avidly follow and learn. Adapt and adopt his techniques. He really is my new friend in the kitchen! 

It's chicken time again! It must be a touch of the sun because I think I am warming up to chicken. I do know that this chicken will be one tasty bird as it acquires those Mediterranean flavors after a long soak in lemon, onions and orange juice. I want to stay true to his recipe. I really do. But I don't have some of the ingredients on hand. So with a regretful shrug I substitute. No fresh fennel, some onion in place. No Arak, just Galliano in its place. No oranges, only lemons. Now that I have taken his recipe into my hands, I proceed cautiously.

I clean the chicken. Against my better judgement I decide to leave the skin on as the recipe deems it best. Lemons are thinly sliced. Thyme leaves are stripped off their stems. As I mix the marinade, the kitchen is suffused with aroma of lemon and thyme. Chicken is doused in the marinade and left to macerate for twenty four hours. I forget about it and go about my business.

LEMON THYME ROAST CHICKEN
Serves 4
GF,WF,EF

8-10 pieces Chicken legs and thighs
3 tablespoons Galliano liqueur 
1 cup Orange Juice
3 tablespoons whole grain Mustard
1 tablespoon Brown Sugar
4 tablespoons Thyme
3 tablespoons Fennel seed
1 Lemon
1 Onion
1 teaspoon Kosher Salt
2 tablespoons ground Black Pepper
1 tablespoon Olive oil


Wash and dry chicken pieces. Trim off visible fat.

Whisk Galliano, orange juice, mustard and sugar.


Strip thyme leaves off the stems and chop roughly. Add to marinade.

Lightly crush fennel seeds and add to marinade.

Season marinade with salt and pepper.

Cut lemon into thin slices.


Slice onion into thin wedges.

Put chicken, onions and lemon slices into a glass container and pour marinade over it.


Drizzle olive oil over chicken.

Cover and marinate chicken overnight.

Heat oven to 450F.

Remove chicken from marinade and place skin side up on a foil-lined baking sheet.

Save the marinade.

Roast chicken in oven for 35-40 minutes till skin is golden brown and crispy.


Pour marinade in a saucepan and bring to boil. Simmer for 5-8 minutes.

Serve chicken with cooked down marinade as gravy on the side.


NOTES

The chicken tastes best just out of the oven. If you need to make it earlier, then reheat the pieces in a hot (400F) oven for 5-8 minutes.

The original recipe called for fennel and clementines. I love the flavor of charred lemon so that worked for me.

Try to use nonstick aluminum foil. Cooked chicken slides off the foil in a jiffy with very little mess.


The kitchen is engulfed with the delicious aroma of roasting chicken and lemons. I peek at the chicken with much anticipation!! The skin, crisp and caramelized, is studded with mustard seems and fennel. Roasted alongside carrots, the chicken splutters and sizzles. Soon its time to plate up a mound of bronzed legs and thighs. Crisp roasted carrots flank the meat. The omnipresent tomato and parsley salad accompanies our meal. A convivial silence pervades the table as we slice and dice. The chicken is so very moist. A knife seems superfluous as the meat gives easily. Roasting chicken with the skin on, is today's lesson. This recipe gets a vigorous nod of approval. As G stuffs his mouth,  he mumbles that he can't stop eating the chicken. And the carrots too!! I will post the carrot recipe in the near future. It is another keeper!


Tuesday, September 16, 2014

Fish Tacos


How many ways can I make fish tacos? Grilled? Fried? How about a quick saute? My choice of fish is cod. I love the way it flakes, it's buttery texture, the way it cooks. Purists like mahi mahi. None of that for me. The cod in the freezer will be quite adequate. I usually deep fry the fish, as the crunch is well loved in my not-so-eager-to-eat-fish household. This time I exercise great restraint and try a healthier version. Let's see what the verdict will be.

FISH TACOS 
Makes 6


1/2 pound Cod
1/2 teaspoon Ancho Chile powder
1/2 teaspoon Paprika
1 teaspoon Cumin powder
1 teaspoon Garlic powder
1/2 teaspoon Oregano
1/2 teaspoon Kosher Salt
1 tablespoon Canola oil
4-6 Tortillas
Pico De Gallo (recipe below)
Cabbage Slaw (recipe below)


Wash and cut cod into 1 inch pieces.

Coat cod with ancho chile powder, paprika, cumin, garlic, oregano and salt. Mix well and let fish sit for 30 minutes.


Heat oil in a nonstick pan.

Add fish and sauté quickly till done on a high flame.


Warm tortillas.

Top with fish, pico de gallo and cabbage slaw.

PICO DE GALLO
Makes 1 cup

2 Tomatoes
2 tablespoons Cilantro
1/2 Red Onion
2 tablespoons Lime juice
1 teaspoon Kosher Salt

Chop tomatoes into small chunks.

Mince onion and cilantro

Mix tomato, onion, cilantro, lime juice and salt.


CABBAGE SLAW
Makes 1 cup

1 cup thinly slivered Cabbage
1/2 Red Onion
1 green Chile
1 tablespoon Cilantro
2 tablespoons Lime juice
1/4 teaspoon Kosher Salt

Thinly slice onion and green chile.

 Mix cabbage, onion, chile, cilantro, lime juice and salt.


Lunch is a quick affair.  On a sweltering afternoon, tacos chaperoned by una cervesa is a summer's delight. Warm tacos are topped with crusted fish nuggets. A heaping of tomatoes, cabbage and onions go on. Fold the tortilla in half and then take a big bite. Did you notice that you have to tilt your head sideways to eat tacos?? A healthy mess of fish drippings, tomatoes and slaw litter the plate. The dish is literally relished and devoured. Even as G finishes the last morsel, he claims the fried ones do taste better. Succinctly, I tell him to stand in front of a hot wok and perform that enviable task the next time we have tacos. 

Thursday, September 11, 2014

Heirloom Tomato Soup


I can hear the steady bubble emanating from the pot on the stove. Cupfuls of diced tomatoes mingle with onion and garlic, enveloping the kitchen in a wonderful aroma. These are the tomatoes that get relegated to the fridge. The ones that are beyond the realm of sandwich or salad. A little mushy, a bit too ripe..but still good, don't get me wrong! I have this thing about putting tomatoes in the fridge. Somehow their texture changes. The taste gets altered. But then that's me, my idiosyncrasy. I use the fridge only as a last resort. So the ones in today's soup are the ends, the mushy middles, the slices that don't make it between two slices of bread. 

My bumper tomato crop has me straining at the creative leash! After making chutney, marinara, numerous tomato related curries, frittata, salads and sandwiches..I have almost reached the end of my resources! Consequently a large number of these globes have now been relegated to the freezer. Yes... I just put them into Ziploc bags and freeze them. They are then perfect for a quick sauce, a curry or saute. Though, no salad for these babies!!! Defrosted, they turn into wonderful pulpy messes. I'm up to 8 gallon-sized bags. Fresh tomatoes for me through winter!

These heirlooms I use have completely weighed down the plant. They lie sprawled over Romas, and Big Boys. They are huge, as big as the palm of my hand! When you cut them open, you get yellow/orange flesh riddled with crevices. Perfect pockets for a drop of olive oil or some slivered basil. One slice and a dollop of green chutney on bread transports me to a crowded Bombay street. Two slices and fresh Mozzarella on a brioche bun and I am the happiest soul at lunch. I use one half as a base for burrata doused with olive oil. Heavenly! I can rhapsodize over the pleasures of heirlooms incessantly. But let me finish the meal at hand.


HEIRLOOM TOMATO SOUP
Makes 2 hearty portions or 4 small cups
DF, GF, VN, WF, VG, EF

1/2 red Onion
1 Garlic clove
3-4 cups heirloom Tomatoes or any tomatoes
2 tablespoons Olive oil
1/2 teaspoon Kosher Salt

Cut onion and garlic clove into small dice.

Chop tomatoes into chunks.


Heat olive oil in a deep pan.

Add onion and garlic and saute for 5 minutes till onion is transparent.

Dump tomatoes into pan, stir and bring to a boil.

Once it boil, lower flame and let tomatoes simmer uncovered for 15-20 minutes. Stir occasionally, mashing pulp with spoon. 


Puree pulp in a blender.

Pour puree into the pan, season with salt and let it come back to a low boil.


If you think it's too thick, add a few tablespoons of water.

Serve soup hot with crusty bread.


NOTES

I use heirlooms as I have an abundant crop. Please use any farmer's market fresh tomatoes. The quality of the tomato makes for the best tasting soup. Supermarket tomatoes just don't do the job. Sorry!!!

Blenders work the best with this soup. You could try an immersion blender, by the soup doesn't have a lot of liquid so you WILL wear the soup!!

For a sophisticated version, first blend and then strain the puree.


G says he's looking forward to lunch. The aromas are whetting his appetite. I toast a slice of sourdough to go with the soup. Bowls of soup sit side by side. A spoonful of this thick potion and our mouths fill with an amplified tomato volume. The orange colored creamy spoonful belies the simplicity of taste. I chew on bits of tomato and onion . A hint of garlic and flecks of skin give the soup a bite. The taste of fresh pureed tomatoes is indescribably good and wholesome. Toasted bread sops up soup instantly. Roast beef, mushrooms, Swiss cheese and arugula sandwiches come in a far second. We sip. We slurp. We savor. Sighs of contentment abound. Olive oil, onions, garlic and tomatoes, the fundamentals of life in my kitchen, come together in perfect harmony.  The intense flavor of a just-picked tomato spoils me for any other. I guess a little June spade work yields a big September bounty.


Monday, September 8, 2014

Vegetable Tian


The Hawkes' are visiting us. This is the first leg of their once-in-a-lifetime adventure around the world. They truly are a delight. Enthusiatic, accommodating and willing to eat whatever comes to the table. My delight at seeing empty serving dishes is repeated every night!!! 

Amy and Rob have left very little behind in England. Just a few material things, but lots of family and friends. With nary a worry, backpacks just about filled, they plan to circumnavigate the globe traversing North, Central and South America. Then comes South Africa, where Amy's family comes from, on to Australia and Asia. Have I left out any continents??? Antartica? You can't blame them for leaving out one land mass!! And they blog about their journey too!

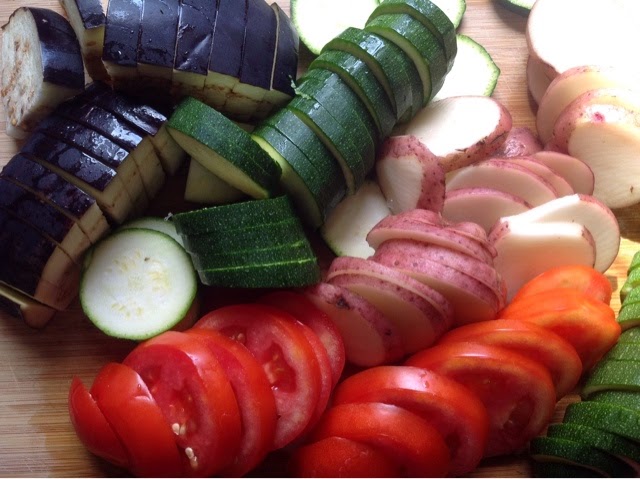
They have enthusiastically eaten my biryani, Khau Swe, tacos and steak and potatoes. It's Italian tonight. I make a vegge bake. A tian. That name has fascinated me so!! I can roll it off my tongue effortlessly. Though it sounds exotic, maybe Spanish, a bit Chinese, it really is a form of assorted summer vegetables, robustly roasted. I cut half moons of eggplant and red potatoes. Zucchini circles and tomatoes round off the veggies. I plan to wedge them in a rectangular baking dish. Then an idea strikes. Why not lay them in concentric circles? I start with eggplant, potato, zucchini and tomato, making my way around the baking dish. It take a while, but the result is startlingly lovely. My work of art goes into the oven. When it comes out I will smother it with gruyere.

VEGETABLE TIAN
Serves 4-6

1 big Eggplant
3 small Red Bliss Potatoes
2 Zucchini
3-4 Roma Tomatoes
1/4 cup Olive oil
1 tablespoon Butter
4 Garlic cloves
1 tablespoon Thyme leaves
1/2 teaspoon Kosher Salt
1/2 teaspoon ground Black Pepper
Cooking spray or Butter
1/2 cup grated Gruyere 

Slice eggplant in half lengthwise. Slice the half portion once again lengthwise in half. Cut the halves into 1/5 inch slices.

Cut potatoes into 1/5 inch slices.

Slice zucchini and tomatoes into 1/4 inch slices. If the tomatoes are big, half and slice.


Spritz  a circular 9 inch baking dish with cooking spray. Or liberally grease dish with butter. Your choice.

Start with the eggplant, then a slice of potato, followed by two slices of zucchini, ending with a tomato slice. Start with an outside circle. End with the inner one. If you have extra pieces of veggies, wedge them in as the circles need to be fitted tight.


Heat oven to 425F.

Peel and cut garlic into a fine dice.

Take thyme leaves off their stems and roughly chop leaves.

Heat olive oil and butter in a saucepan. 

Add garlic and thyme and let then sizzle for 30 seconds.

Pour olive oil over vegetables. 

Season with salt and pepper.

Bake for 30-35 minutes.

Scatter gruyere over veggies and dish it out.


My guests come late for dinner. We chat about their incredible day. A stranger in a bar gives them tickets to the US Open quarterfinals!! Another astonishing, heartfelt story about life in the Big Apple. 

The tian experiment does not have too many takers!!  Folks, this is my first attempt!  So the bake gets another life. I arrange the veggies pell mell in another dish. Leftover egg and milk from this morning's French toast gets spiced up and poured over the veggies. Into the oven for 40 minutes and the tian is a tasty golden brown resurrection !!!! Sometimes, once is not enough!


NOTES

I added 2 eggs, 1/2 cup milk, a large pinch of crushed red chiles flakes and a slittle salt. Whisked well. poured over veggies and baked for 40 minutes. This addendum is for souls addicted to spice!